December 31, 2012

me wants infinity too! :P

Too kick Darkezekiel's Haqqislam army in its derrier, I've started to paint up my own infinity army. It's gonna be ALEPH. I like the idea of an AI running wild (although they'd of course never ever turn on humanity, if you want to believe that hehe).

Started with one of the myrmidons. I'm going for a very limited palette, tint of purple in every colour I use.


December 30, 2012

Infinity Army

Hi!!

my Infinity army is growing very fast and it is so funny to paint them because of all the details.
I have used the airbrush for the base colour. Next step i used a black/brown mix with a lot of water to make a wash. After that i was painting the shadows and highlights and and made the details.
I optimized the whole painting process so that only need about 2-3 hours for each mini because it´s a tabletop army for playing and not a showcase project. I´m very happy with the result and i hope you like it too. There are much more miniatures on my painting table, so stay tuned.

ps: the Sniper on the last pictures was painted by Andi (Androsch) as a christmas present, thank you!

here the pictures
best regards

Darkezekiel

December 23, 2012

Merry Christmas, and Infinity news!!


Just one day to christmas eve and i want to wish you merry christmas and many many presents.
Today i finished my second Infinity miniature and i made some better fotos.

Odalisque


Ghulam Infantry


best regards
Darkezekiel

December 19, 2012

Pixar's "For the Birds"

I'd like to add another short animation movie to our collection.
This time, a well known classic:

 "For the Birds" by Disney Pixar
enjoy!


Giant Owl finished

Did it!
I Finished my wood elf highborn on giant owlfalconhawk, just in time for my P500 over at tabletopwelt.de
Oh yeah, and some dryads too...


December 16, 2012

WIPs

Here's another WIP shot of my Giant Owl. Have to finish this project (+ 20 dryads) till midnight... ;)


Infinity

Hey!!

At Friday´s painting session we talked about the Infinity game at the tabletopclub near my home
and i decide to make my own small Infinity gang. I was lucky because one of the clubmembers sold me his miniatures and so i was able to start with cleaning the miniatures. At Saturday i was painting my first mini.

Sorry for the bad fotos but i made them without good light just with the camera flashlight.
I will show you better pics, i promise!


regards Darkezekiel

December 12, 2012

Woodelves - Giant Owl

Hi!

Some shots of my current woodelves project again
(German readers click here)

The model is from Coolminiornot. I did some conversions on the lady sitting on top. I made here sit a bit more uprigth and gave here a sword and a bow to make here look more like a fighter. I also added some rope and leaves to give her more of a woodelf touch.

Until now, I airbrushed the owl and sketched the pattern that a snowy owl would have.
Still a looooooooot to do. ;)


December 08, 2012

Animation Dec 2012

Hi pumpkin friends,

I am a real aficionado of short animation movies.
Therefore I will start with a new category within our blog:

SHORT ANIMATION MOVIES!

And here is the first one for you: One more beer

One More Beer! from pedro conti on Vimeo.

I hope all of you will enjoy it.

With best wishes
Colouristo


December 05, 2012

Late Night WIPs

Hey!

Working on a new project now, it's a friendly gift to Darkezekiels soon-to-be-famous Pirate Oger Army!

Link (warning! this is german ;))

I converted an Oger Firebelly (is that it's name?) into a creepy black voodoo priest, standing in a swamp, surrounded by a horde of zombies, spitting green toxic stuff toward his enemies.

I tried some desaturated dark brown colours on the skin, highlighted with Space Wolves Grey...


December 02, 2012

Christmas Imps

Hello!

My name is Kurt aka Darkezekiel and i´m also a member of the pumpkin crew.
I´m painting miniatures during my free time but that´s not all.

Today is the first advent sunday and me and my family are sitting at the kitchentable to
make some  christmas decoration. I want to show you a little different miniatures i made myself.
I hope you like them.

Mrs. and Mr. Imp


best regards
Darkezekiel

November 26, 2012

Two more busts!

Hi!

Two more busts, this time by "Badsmile Miniatures". I started painting them quite a while ago and took them out of my cabinet recently to finish them. (I'm on some kind of "finish your old stuff" trip these days...)


The "Male Action Hero" was painted in oils. I added a samoan style tattoo at the end, which reminded me of my bad freehand skills. ^^

I tried a very limitted palette on the "Dark Elf". Wanted to give it a cold and sinister look.

Regards,
Androsch

November 24, 2012

Brom, Brekk and the Sarge

Hey there,

During a "Pumpkin Painter Power Painting Evening" with lots of white whine, great food and nice company, I was able to finish three of my current projects: Brekk the Lion and Sergeant Cheeky by Forged Monkey, as well as Brom the Hard Bark (I call him Brom the Gutter Dwarf ^^) by Enigma.

Brekk is a really nice bust which is great fun to paint. The face has a lot of character. You can assemble it with or without the helmet by the way. Check out the other great products at http://forgedmonkey.com as well!


Brom was a kind of neverending story. I think I've been painting (or not painting) this mini for 2 years. I had 3 different versions of the base and f***ed up two of them with 2k modelling water. Finally, I was able to rescue the last version. ^^

 CMON

Sergeant Cheeky was one of Raffaele Picca's (Forged Monkey) first releases. It may have some flaws, but it's still a very expressive character in my opinion. I tried a very unusual colorscheme on this one. ;)


Kind Regards,
Androsch

November 17, 2012

Don Quijote

The next of my mini's I would like to show to you, is my loved "Don Quijote".
Loved, because I felt in love with the mini right from the begin. I found this for me so special piece in the Nocturna shop. And immediately I knew, this must be my next mini.

Here it is:


It is only my third mini I painted so far, but for me it is very vissible that a huge improvement has taken place in my mini painting skills.
I am still a beginner, but now I am a little better beginner.

Taking part with him at the Monte San Savino Contest 2012 was my goal. Unfortunately I was not able to go there by myself, but thanks to Darkezekiel to bring him there all the long way.

And, it was worth to do it - BRONZE  in Standard - UNBELIEVABLE for me!

I would have been already happy to award some medal in the beginner class, and now I am even a little bit more proud of my Don Quijote :)

I hope you like him as much as I do.

Your Colouristo

PS: Now it is very clear, I am 100% mini painting addicted !


Gandalf

Here I would like to introduce you to my first mini ever!


Due to my son and his interest regarding the tabletop game of "Lord of the rings", I startet to explore the world of miniature painting. And so my journey started with this first mini.

I was very lucky, because I had the best mentors right from the begin - "Darkezekiel" and "Androsch". It is time to say "THANK YOU MY FRIENDS!". Based on your great experience, your personal introduction and your advices, it was real fun for me to explore the wonderful world of miniature painting.

And I am very proud of my first mini :) !

I hope you like him too?

Best wishes
Your Colouristo

November 11, 2012

Colouristo's Necron Army - Part 2

During our 2nd NECRONSYTLE GiG we have worked again with full Pumpkin Painter Power.

As basis for our assembly line work we have defined several stations.
Each of them handled by one of our crew members:

- base coating
- primer colouring with airbrush
- weapon base painting
- white colour painting as basis for flash illumination
- discreet colouring with airbrush of OSL illumination
- base primer coating with airbrush
- base highlights with brush and subsequently dry brushing
- base edge painting with black

Only one evening and the first part of my NECRON Army painting is finished.


 Necron Warriors


 Necron Deathmarks


 Canoptec Wraiths


Canoptec Scarab Swarms

I would say, the first part of my NECRON Army looks great!
And this only within two Evening-GiG's.

What do you think?

With proud NECRON greetings, and many thanks to our entire Pumkin Painter Crew!
Colouristo

PS: Looking forward to our next Necron GiG for finishing the rest of the army :)

November 10, 2012

Colouristos's Necron Army - Part 1

As promised in my little Necron army teaser, I will show you now sowe WIP details of our "1st Pumpkin Painter NECRONSTYLE Warhammer 40K Necron Army Painting Gig :) "

First I have to tell you that I had no army at all so far. Which was absolutely unacceptable!

Therefore I thought about which army I should look for. And my first idea was to choose the new Chaos Space Marines ... BUT then I realized that there is only one true army for me ...
Yes - THE NECRONS!

And so I did what I can, and I convinced the entire Pumpkin Painter Crew that it would be a good idea to build up my army together ... And ... It worked great!

We joined one evening together at my ART Hall - and we unpacked the boxes containing all my loved Necron's.
At some hours it was hard, but also very funny. Out of our group we gained a lot of energy to do the painful deflashing of a lot of figures.

BUT at 4 o'clock in the morning ... see the astonishing result:


Hard to believe, just one night and a full Necron army was built up in a very nice way!

In detail:

7 Necron Scarab Swarms
20 Necron Warriors
5 Necron Deathmarks
5 Necron Lychguards
1 Necron Overlord
1 Necron Destroyer
3 Necron Canoptek Wraiths
1 Necron Triarch Stalker
1 Necron Doomsday Ark

I am sure all of you know how long it normally takes to create such an army by one person (If you take care about good deflashing).

This is real Pumpkin Painter Power!
And now I am the proud owner of my first army - MY NECRONS :)

And let me tell you, the 2nd Necron Painting GIG was even more impressive ...

Your
Colouristo

November 06, 2012

Dark Eldar Army - The Ruthless Ice Blades

Today I want to introduce you to my latest project. It's a Warhammer 40k Dark Eldar Army called "The Ruthless Ice Blades".

So you might ask why Dark Eldar and why this name. I selected Dark Eldar for a number of reasons. First, I want to have an army with as much female miniatures as possible. In Warhammer and especially in Warhammer 40k that is not very easy. Second I want miniatures which are more human and not robots, supermen in cans or insects. So the range became even smaller. And last but not least I love the miniature of one of the leaders, Lelith Hesperax. So guess who will be the leader of "The Ruthless Ice Blades".
The name has also various reasons. Before I started this project I read the codex and especially the background story. All the time I had the picutes of a dark, cold city made of black and glassy stuff going around in my head. For me Dark Eldar are as cold and dark as their city. I also figure that there is always an icy wind howling in the streets. These ideas led to the name and also to my color scheme.

But enough talking, here are the first pictures of a test miniature of "The Ruthless Ice Blades":


Stay tuned, there is more to come!

November 03, 2012

Horthak the Black Crow

Hi folks!

Here's my first contribution to the showcase section on Pumpkinpainter.
I've just finished Horthak the Black Crow by Andrea Miniatures, 54mm. I mainly used acrylics and finished the skin and the leather with oil colours. He's now proudly become a part of Colouristo's collection. ;)
I'm quite proud of it, since I think it's my best miniature so far.
Take a look:


Regards, 
Androsch


November 02, 2012

Saint Celestine


Pumpkin Painter Crew - Art Work

Yipiee the inspiration works already.
My little son has illustrated our crew as well.
It is worth to have a look at it.
It is quite similar to my drawing, but much more modern art :)


November 01, 2012

Pumpkin Necron Army


You can't keep a good robot down ... this is the truth!

Therefore I will introduce you to my necron army.
The painting of the same was done in our unique "necron style crew approach"!

... more soon  ...

 0100001111000101000101010100001111111...


October 31, 2012

The Big Bang - The birth of the Pumpkin Painter Crew

The big bang happenend, and we are ready for take off!

To give you an impression of the Pumpkin Painter Crew my little illustration below shows exactly how we look like...


I think our friends will immediately see the similarity with the real persons ;)

To give all of you a little hint (from left to right):


"Morgaine"                   - our fantasy driven lady who takes care of our entire crew 
"Colouristo"                  - myself and a real jack of all trades
"Androsch"                   - a huge guy - our calming influence
"Darkezekiel"               - our speed painter, always as fast as an airbrush
"CollectusMaximus"    - our passionate collector

I hope this creates your interest and all of you are looking forward to join us on our ongoing art exploration tour!

See you ...
Colouristo


Tutorial - How to quickly make a banner from transparent foil


Hi there!

I'm painting an imperial standard-bearer at the moment for whom I decided to make a new banner, 'cause I wanted something more dynamic than the standard GW banners. Well, I got a tip to try transparent foil (I'm not sure if that's the right expression, it's the stuff on which you write and project it to the wall then ;)) and it turned out pretty good. I was wise enough to shot some photos in the process to be able to do this tutorial! :)
Ok let's start!

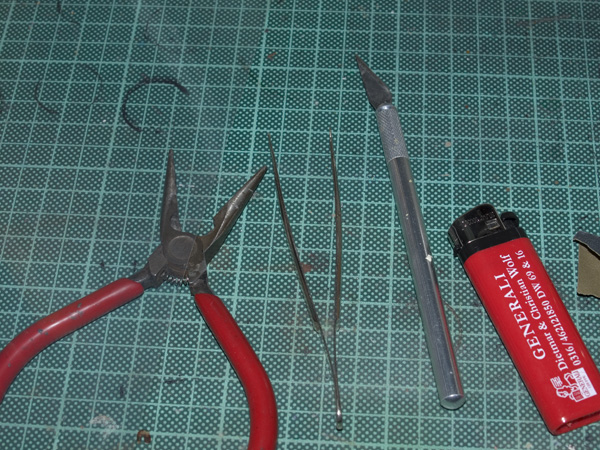
1) The tools you need: a caliper, a knife, tweezers and a cigarette lighter


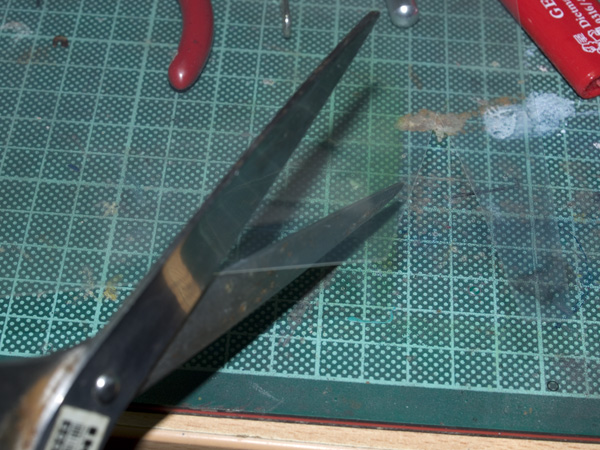
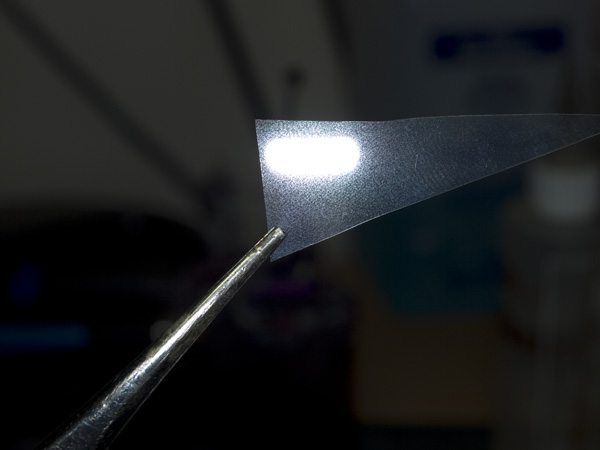
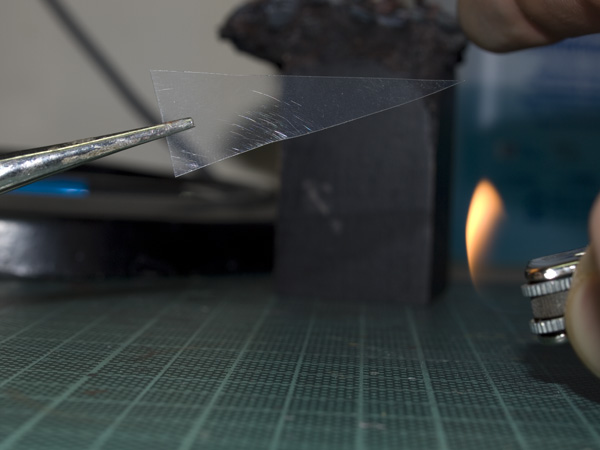
2) Cut the transparent foil into a shape you like. I chose a triangular one.


3) Now the tricky part. Heat up the plastic with the cigarette lighter. Don't get to close  to it, you don't want to melt it. When you have the right distance it will start to bend  after some time. It usually bends to the side where the heat comes from. Play with that to get the desired shape. You can use the tweezers here too, but you have to be quick! ;)


4) You should end up with something like this... (I already sanded it a bit here)


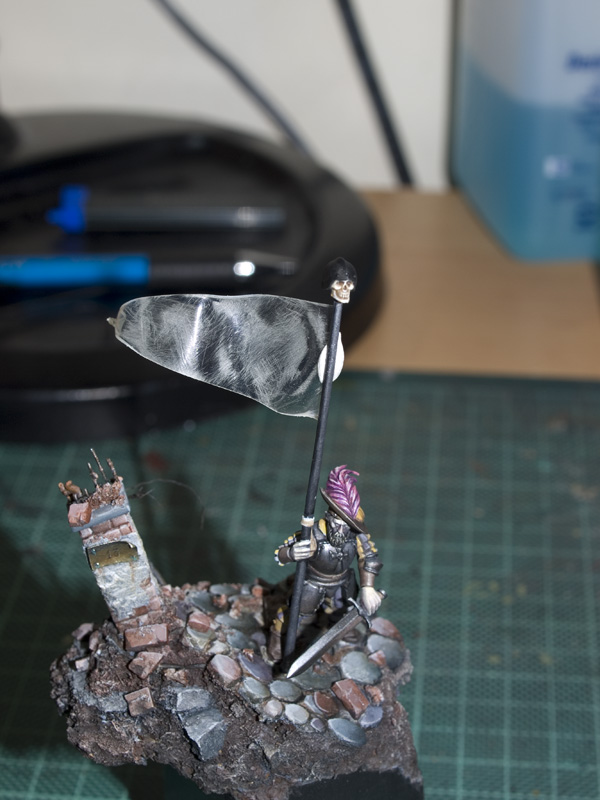
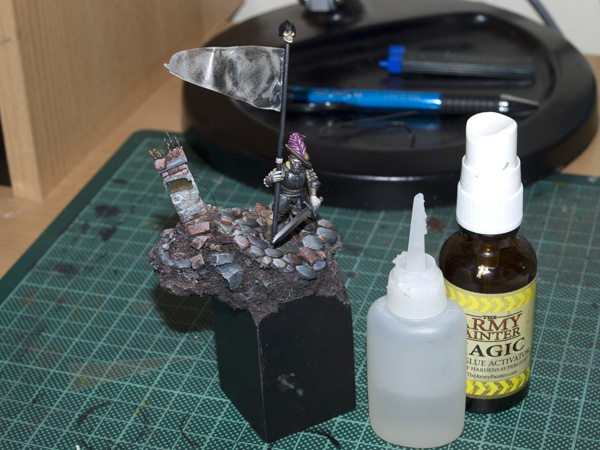
5) Attach it to the bannerpole. I used some pattafix here to try some angles before glueing it.


6) Then glue it on there forever. Superglue activator is really usefull here.


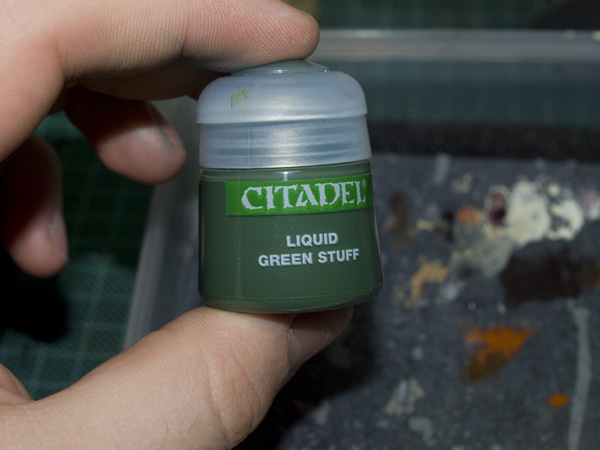
7) You may use some Liguid Green Stuff or some other putty you like to make the transition to the pole more convincing. I also gave it a thin coat to make the plastic a bit stiffer, but it didn't work. Maybe Milliput or Magic Sculpt would have worked better for that.


8) And that what it looks like after airbrushing...


The whole thing didn't take more then half an our to finish (even with taking photos in between).

So that's it. I hope I was able to give you some inspiration for future banners! ;)

Regards,
Androsch