Showing posts with label Morgaine. Show all posts

August 03, 2014

Zorabeth - WIP

Hi everybody!

After having not posted any new projects for a long time I want to show you my newest one. I started to paint Zorabeth from Andrea Miniatures during the last Massive Voodoo Painting Workshop in Vienna in June.
I decided to do something I thought I will never do...painting Non-Metallic-Metal. After painting almost all of the armour and the wings I can say one thing for sure: this needs a lot of patience and time! But for me the result is worth every minute.

Right now almost all of the armour is 80% finished. It still needs the final highlights as Roman showed me how much difference these highlights make. The cape has basic lights and shadows but there is still a lot of work to do. The skin of the horse is nearly finished. I'll wait until the other parts of the miniature are nearly finished too before I decide whether I still have to improve the painting of the skin of the horse or not.
All the other parts just have basic color but nothing else.

So here we go.
The horse:


Zorabeth:


I hope you like her!

May 02, 2014

Henrik Lundqvist - finished

Hey everybody!

We're back from a wonderful and exciting weekend in Germany at the Duke of Bavaria. The Pumpkin Painter Crew was quit successful since everyone got a medal :) Congratulations to you guys! And of course congratulations to all the other winners as well.

Just before the Duke I managed to finish Henrik Lundqvist and I want to show you the final pictures.
Enjoy!


A little explanation of the writing on his base:

The abbreviations are standing for the following stats:
GP - games played
W - wins
L - losses
OT - overtime/shootout losses
SO - shutouts
GAA - goals against average

Last season he was the fifth best goaltender in the NHL. He also got voted  into the second All-Star Team of the season.

I hope you like him!
Morgaine

January 07, 2014

Henrik Lundqvist - WIP 2

Hey!

Another painting night and Henrik Lundqvist is making progress :)

I did the lettering and the shirt number on the back of the jersey. Also I started with the freehands on the catch glove and the blocker but they are not finished yet. A few other details are also in progress, but see for yourself.


January 05, 2014

Henrik Lundqvist - WIP

Hey everybody!

It has been very quiet in our blog during the last weeks. Now it is time for the Pumpkin Painters to awake from our winter sleep :) We made use of the Christmas holidays and started the new year with some new projects.
My first one for 2014 is a birthday gift for my sister. She loves hockey and likes watching NHL games and so we gave her a miniature of a hockey goalie. Since I didn't know which player she would like to have the gift was the plain figure and the paint job the way she wanted it.

Her choice was Henrik Lundqvist from the New York Rangers because of the great color scheme of the jersey and of course because of the amazing design of his helmet.

So here are the first WIP shots of Henrik Lundqvist :)


At this point the basic color of the jersey is finished and the helmet is also almost done. After I took the photos I decided to redo the stripes and the Rangers lettering.

November 16, 2013

Huntress of the Night

Hey everybody!

I finally finished my Huntress of the Night and I did it just in time to take her to Monte San Savino :)

I'm really happy with the result and also with my decision to change the color scheme. She didn't win a medal in Monte but that's okay. For me it's more important that she looks the way I planned to!

Painting this miniature wasn't easy. I really loved the mini from the first moment and I wanted her to be something special. For me the promotion paintjob was fantastic and it was hard to figure out a different color scheme that worked for her. Also the base and the general setting of the scene wasn't easy to find and decide.

In the end I used my favourite colors and gave her a dark night scene inspired by old streets in an English city.

I hope you like her too!


September 29, 2013

Huntress of the Night - WIP

Hey there!

Yesterday was another productive painting night and I achieved some progress with my newest showcase project. You may recognise the mini from my post about the private painting session with the guys from Massive Voodoo. But as you can see I did some major changes concerning the color scheme.

The mini is still WIP and so is the title. But see for yourselves:

August 26, 2013

Lightning Scars - Space Marines - Cybot WIP

During our last painting session I worked a bit on the Cybot for my Lightning Scars army. I think it is nearly finished. Just take a look at the latest WIP shot.


August 18, 2013

Lightning Scars - Space Marines - Scouts

I finished another squad of the Lighting Scars. Five Scouts with Sniper Rifles are ready to show their enemies what real fear is about.


Enjoy :)

August 05, 2013

Lightning Scars - Space Marines - part 2

The first squad of the Lightning Scars is finally ready to proof themselves on the battlefield.
It is a Tactical Squad consisting of 5 Space Marines with bolter guns.

There are 4 more Space Marines to come, one with a plasma gun, and also a Sergeant.

But for now enjoy the first 5 miniatures!


June 19, 2013

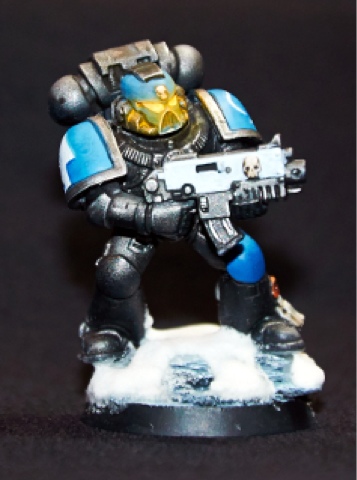
Lightning Scars - Space Marines

Since I cannot stay with one project at a time I recently started a new army :) Let me introduce you to the chapter of the Lightning Scars!

 
The reason I started this army was that I wanted to have a different army to play with besides my Dark Eldars. For me Dark Eldars are not so easy to play, so I wanted an army where the fighters are a bit stronger and not so easily killed. I hope that my choice was right ;)

Some more shots of the first brave fighter:


I hope you like them!


June 13, 2013

I love chocolate! - How to sculpt a Chocolate Cake

Hey everybody!

I have to admit, beside my addiction to miniatures I'm also a true chocolate lover :) So how about sculpting a Chocolate Cake? When our Pumpkin Crew planned a big barbecue for Coloristo's/Oli's birthday I took the chance to bake THE chocolate cake of all chocolate cakes.


It consists of two layers of chocolate cake (I would say it is a kind of sponge cake) with a hint of espesso flavor, a layer of chocolate cheese cake and, I think you can already guess ;), a super chocolate sour cream frosting. And if you still need some extra chocolate, just add chocolate shavings on top!

It's not very difficult, so go try it yourself!

Chocolate Cheese Cake by recipe girl

What you need (go to your supermarket of confidence):
Chocolate Cheese Cake:
140 gram / 5 ounces bittersweet chocolate (70% cocoa), chopped
450 gram / Two 8-ounce packages cream cheese, at room temperature
64 gram / 1/2 cup + 3 tablespoons granulated white sugar
2 tablespoons unsweetened cocoa powder
2 large eggs

Chocolate Cake:
220 gram / 1 3/4 cups all-purpose flour
190 gram / 1 1/2 cups granulated white sugar
85 gram / 2/3 cup unsweetened cocoa powder
1 1/2 teaspoons baking soda (yes, the one you use for your snow bases)
1/2 teaspoon baking powder
1/2 teaspoon salt
1 teaspoon instant espresso powder
3 large eggs, at room temperature
1/2 liter / 1 1/4 cups buttermilk
250 gram / 3/4 cup butter, at room temperature
1 teaspoon vanilla extract

Chocolate Sour Cream Frosting:
680 gram / 2 cups bittersweet chocolate (70% cocoa), chopped
170 gram / 1/2 cup (1 stick) butter, at room temperature
250 gram / 1 cup sour cream
2 tablespoons maple syrup


Here we go!
1. Preheat the oven to 160° C.

2. Prepare the Chocolate Cheese Cake: you need a round baking pan, baking paper and melted butter. Just put the paper on the bottom of the pan and paint the inner sides with butter.
Next melt the chocolate in a microwave. I used a little bit butter with the chocolate so it doesn't burn.
Now you have to mix the ingedients in the following order:
- cream cheese (mix it alone with an electric mixer first)
- sugar and cocoa powder
- eggs
- melted chocolate (let it cool off a bit before putting it into the batter)
Fill the batter in the pan and bake it for 30-45 minutes until the surface is solid when you touch it.
Now let it cool off. When it is cool enough put it in the freezer until the rest of the cake is ready.

Don't turn off the oven! You'll need it for the chocolate cake.

3. Prepare the Chocolate Cake: Again you need one or two round baking pans of the same size as the first one. I used one and splited the cake in halfs after baking them. You can also use two pans and divide the batter in halfs. First you have to paint the whole inner pan with melted butter. Afterwards put some flour into the pan and spread it all over the it until the whole pan is covered with flour.
Next mix all the ingredients except the buttermilk. At first add just 1/5 of the whole amount of buttermilk. After the batter is smoothly mixed, add the remaining buttermilk and mix it with high speed for about 30 seconds.
Put the batter in the pan and bake it for 30-35 minutes. Stick a toothpick in it and if there is no batter on it the cake is ready!
Let it cool off.
Finally, if you used just one pan like me, take a thread and arrange it around the middle of your cake. If you're satisfied with the position, cross the ends of the thread and pull them together until it cuts through the cake. Now you have two halfs!

4. Prepare the Frosting: Again melt the chocolate with some butter in the microwave. Add soure cream and syrup and mix it. Now put the frosting in the fridge for about 30 minutes. The frosting should be sticky and firm.

5. Grand Finale! Separate the two chocolate cake halfs. Put the chocolate cheese cake on top of the first half. When it fits nicely place the second half on top of the chocolate cheese cake.


Now take the frosting and a dough scraper. Spread the frosting upon the cake and the side of it. It doesn't have to be smooth, I really like the rough surface!
If you want to add some extra chocolate, put a black and a white chocolate bar in the microwave for a few seconds (really short! About 5-10 seconds.). Now take a knife and pretend to remove mold lines from e chocolate bars. Tata! Chocolate shavings!

That's it! The ultimate chocolate cake for chocolate lovers :)

I hope you like it!


May 13, 2013

Massive Voodoo Private Practice - Morgaine

Hey everybody!

Back from Germany after a great weekend at the Duke of Bavaria (you will find a review about this truely special event soon here on our blog) I'm full of impressions and nearly bursting with motivation :) It fits perfectly that some of our Pumpkin-Crew arranged a private practice session with Roman and Raffa from Massive Voodoo directly after the Duke :) It was really a great experience and I'd like to thank you guys for these wonderful days!

Our private session started on Tuesday morning with our arrival at Roman's and Raffa's studio. Each of us took various projects with us and at this time we were still undecided which one would be our choice for the session. Finally I chose "Luz, New York" by Nocturna Models.

A quick shot of the primed mini:
I got it as a Christmas present from my parents and I was quite nervous about painting this figure because I really love the promotion paintjob. It has a strong athmosphere and fits the sculpt perfectly. I hoped that with Roman and Raffa backing me during most of the painting process I would manage to reach my personal high goals for this mini.

First, some quick words about the choice of color: I thought of a moonlight scene, so my colors are mainly cold and blue. As a contrast some parts will be painted in red, but also quite cold. At least that's the plan :)

Before we started painting each of us set our personal goals for the following days. Mine were to paint more precise, to learn how to organize the painting process and my special focus were on painting light and painting metal (this really is one of my weak spots).

The goal for the first day was to decide which color to use where and to apply the basic layer to the mini. We startet right of with our airbrushes and it was an important lesson for me where and when to use this painting instrument.


As you can see there where the first lights and shadows. Also the overall lightning of the miniature was created.

After long hours of painting and lots of explanations of our two coaches, at the end of day 1 the miniature looked like this:
I really have to admit, that the colors I used are a great deal darker and especially more desaturated than the ones I usually use and like. Especially the color of the face made me unhappy because at this stage it looked like a dead zombie to me. And this was not what I had in mind! But I stayed with the color scheme because I wanted to try and see where Roman's and Raffa's tips would lead me to. And I didn't regret it :) As promised the face (and of course the rest!) changed a lot and in the end I was really happy with it!
After day 1 at 2 in the morning

At the end of the session
On the second day we all needed time to wake up as the first evening was quite long and exhausting. After a coffee or two (or three, or...) the real fun began as we startet to bring more light and shadows, more variety and more highlighting to our minis. During the next hours I learned a lot about finding the right spot for the light and the corresponding shadow. I can't say I do it perfectly now but I think I understand the basic idea behind it.

Another important point for me was what we learned about the so called "last 10%" which make the difference between a good miniature and a stunning miniature. It's all about details and patience :) We only did a few small areas because of the time, but we could see where a bit more effort and a bit more time could possibly take us.
Current state after two days
So what's next? I want to finish all the remaining parts of the miniature and try to apply the "finishing tips" without the help of Roman and Raffa to the rest of the miniature. Also we worked out a great idea for the base (because the moonlight-idea needs a base to become apparent) and I'd like to finish the project with it.


And of course I'd like to test my newly acquired knowledge to other miniatures! I'm especially curious how it will work out on gaming miniatures and maybe a brighter color scheme :)


Last but not least I really want to thank Raffa and Roman for the great session! They really tried to help us as best as they could to reach our goals and to improve our painting skills. Thank you also for the warm and welcoming athmosphere during the whole session. I really took a lot of motivation for my next projects with me!

So stay tuned for the progress of this project :)
Morgaine


March 24, 2013

Wood Elf Spellweaver

Hey everybody!

I'd like to show you one of my entries for Massivevoodoo's the Bananalicious contest. I started it on the last Massivevoodoo workshop in Vienna and finished it during our painting sessions.

I really like the atmosphere of the miniature and I love the dress. From the beginning I knew that her base had to be a forest setting and the wavy dress immediately reminded me of a spring.

So here she is!

February 04, 2013

WIP - Merlin

Hey everybody!

Today I had a sharp struggle with my camera which happen to ignore the autofocus function. Nevertheless I want to show you my current project of Friday's painting session.

I'm painting a Nocturna mini, Merlin, and up till now I have only finished the skin. All the other parts are still just a rough draft.


Sorry for the poor quality of the photo, I promise to win the next battle with the camera ;)